Saturday, April 19, 2008

How to login to Picasa

Here I will explain to you the procedure of logging in to Picasa with the help of screenshots.
First, make sure you have installed Picasa. If not, do it now. If you do not know how to install Picasa, follow the instructions here. In case you find the screenshots are not clear to you, just click on them for a bigger view. Once you do this you will be able to download the free crochet patterns/books I have been talking about at the touch of a button.

Step 1 : You need to have a gmail account like yourname@gmail.com. If not, you can create one here.

Step 2 : Now go to : http://picasaweb.google.com/. You will get a screen like below – On the right hand side enter your email id against “Email” and the password against “Password” . Then click on the “Sign in” button. 

Step 3 : Now you will get a screen like the one below. Read the Terms of Service, Program Policy and Privacy Policy and if acceptable to you, click on the “I accept” button.

Step 4 : You will see a screen like below. At the right hand side you see a box containing “Community Photos”.

Step 5 : Enter “magic crochet” in double quotes as indicated and click on the “Search” button.(Later, after you have tried this out successfully you can check the comprehensive crochet magazines list from which you can use words or groups of words to search for picasa crochet patterns or pattern crochet picasa as some people search for).

Step 6 : Your screen will now look like what you see below. These are pages from books/albums containing the phrase “magic crochet”. Read my post on how to search better to learn more about searching better on the Net. If you click on the individual pictures below it will take you to that page of a book/album and then you can go through all the pictures or go the full album. Alternatively, you can click on the name of the persons who have generously put up their photos for public view. (I do hope all my readers will reciprocate and upload and share their books online with those who have shared already, I think it’s only fair that we should be giving and not just taking).
Step 7 : You could see something like this – here we have 3 issues of “Magic Crochet”.

Step 8 : Click on any one of the albums – what you get below is all the pages of that particular book/album. Now saving these pages one by one would be a very tedious process but with Picasa it’s just a touch of the button. I presume you already have Picasa installed. If not, please check here : How to install Picasa. If Picasa is not installed on your computer, you will not see the “Download Album” link on the left side below the cover page of the album. If in spite of installing Picasa you do not get the download link(it might be grayed out), try restarting your PC after installing Picasa). It also gives you the number of photos the album contains and the size of the album in MB. Sometimes, if the number of MB is too small, the photos may be of low resolution and when you increase the size they get blurd and you cannot use them. Tip : Look for high resolution pictures. All you do now is click on the “Download Album” link.
A word of caution : internet users with a limited account please monitor your bandwidth usage so as not to exceed your maximum limit and get overcharged.
Step 9 : A Picasa window will popup as shown below – click on the “Download” button.

Step 10 : That’s it, you will see the progress as the pages get downloaded and then you can view the albums in Picasa. I hope you enjoyed going through my tutorial and managed to download the free crochet books. If this helped you, do leave a comment here. And spread the good word…. Don’t keep it to yourself. Send my blog link to all your friends!!!

Friday, April 18, 2008

How to install Picasa

I list below the instructions to download and install Picasa on your PC. Even newbies can do it and don't be afraid if you've never done installations before, there isn't much to it and I am explaining herewith with the help of screenshots. (If you think the screenshots are not clear enough, click on them to get a bigger view.) All you need to have on your PC is Windows XP or Windows 2000 or higher. I'm afraid you cannot install Picasa on a Windows 98 PC.

(1) On the right hand side of this page http://picasa.google.com/  is a dark blue button which says "Download Picasa 3.8". As time goes by, this version number may change, so if it is not 3.8, it doesn't matter.


(2) You can click on this button. You will now have to switch between the two tabs/windows as you read the instructions and put them in practice.

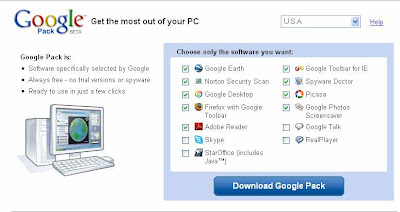
(3) You will get a screen like this one below :


(4) You need to install only Picasa so just make sure that there is a tick mark in the square box to the left of “Picasa”. Since we don’t need the others, you can uncheck them by clicking on the square box against each of the other options that are already “checked” or “ticked”. It toggles, so one click will uncheck it and another click in the same place will check it again. After you do this exercise your screen should look like this :

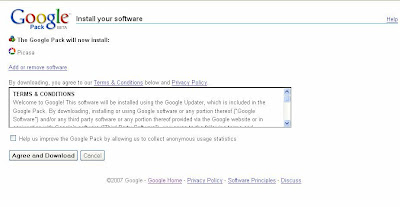
(5) Now click on the blue button which says "Download Google Pack". This is what you will get :

(6) Click on the "Agree and Download" button.


If you are using Internet Explorer :


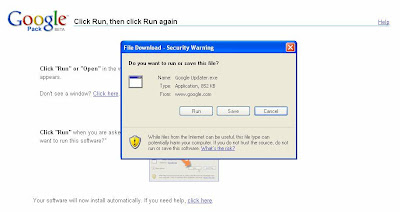
(7) you will get a screen like below :


Click on the “Run” button.

OR


If you are using Firefox :


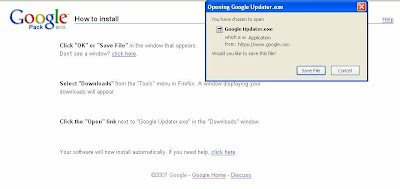
(7) You will get a screen as follows :

Click on the "Save File" button.
Once the download is complete, select "Downloads" from the "Tools" menu in Firefox. A window displaying your downloads will appear. Click on the "Open" link next to "Google Updater.exe" in the "Downloads" window.

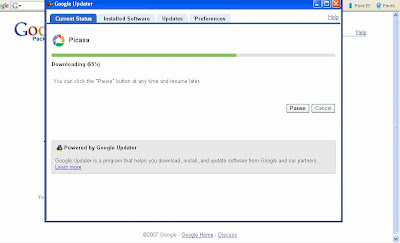
(8) You will get a screen as follows :

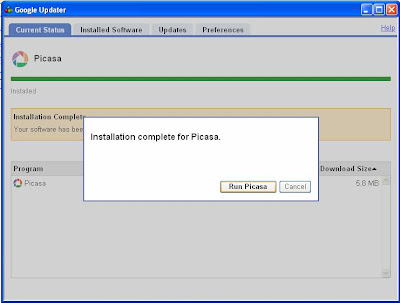
(9) After the downloading process is over, you will get a screen like this :


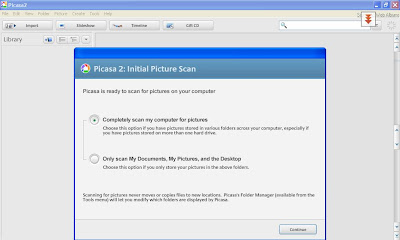
(10) Click on the "Run Picasa" button. Your screen will now look like :


(11) Picasa organises all the photos you have on your PC. Click on the "Continue" button.

(12) This will take a while if you have a lot of pictures on your PC. If you have reached this far, then you have successfully installed Picasa.


Sunday, April 13, 2008

Get free Crochet Books

Would you like to download crochet books like those below for free?? I am not joking.... When I found this out I was truly amazed and I thought I'd share my new-found luck with all you readers and crochet lovers. What you see below is only the tip of the iceberg. There's a big gold mine out there waiting to be tapped... go get it!!


Here I will give you step-by-step instructions on how to download entire crochet books for free at the touch of a button. Don't worry if you are a novice user and have never downloaded and installed software before. I will explain to you in detail with the help of illustrations. If at all you still have difficulty, do leave a comment at the bottom of my post and I will try to reply as soon as possible.

(A) First you need to install Picasa. Detailed instructions are available in my post here : How to install Picasa

(B) After you have sucessfully installed Picasa, you have to login to Picasa. I have written a detailed step-by-step how-to over here : How to login to Picasa

Saturday, April 12, 2008

Poinsettia Doily Pattern

One of the first free patterns I made from the Net is the Poinsettia doily below. I modified the pattern at the end and added a few rows to make it a little bigger. I made this last Christmas and everyone liked it so much that I even made and gifted/sold a few pieces.
This pattern is crocheted a bit tightly, to hide the thread you are carrying underneath as there is no cutting except at the end when you finish off with a particular colour of thread. Whilst changing colours, just draw the new colour through the last two loops on hook of last stitch with the old colour. Always work over the strand(s) not in use.

Materials : Steel hook No. 7 ; size 10 thread in red, green, yellow and white.

Size : Completed doily is about 11.5" in diameter.

Instructions :
With yellow, ch 6, join with sl st to form a ring.

Round 1 : Ch 3 (counts as 1st dc), work 15 dc in circle, join with sl st; fasten off.

Round 2 : Join green in last yellow sl st and ch 3, then dc in same sp. * With red, 2 dc in next dc; with green, 2 dc in next dc. Repeat from * all the way around, alternating 2 red dc and 2 green dc. Join with sl st. (Total 32 dc around). Ch 3 (green).

Round 3 : Work 1 green dc in each green dc and 2 red dc in each red dc. Total 48 dc around. Join with sl st. Ch 3 (green).

Round 4 : Work 1 green dc in each green dc. With red, 2 dc, 1 dc, 1 dc and 2 dc. Total 64 dc; join with sl st. Ch 3 (green).

Round 5 : Work 1 green dc in each green dc. With red, 2 dc in first and last red dc and 1 dc in each of the middle 4 dc. Total 80 dc; join with sl st. Ch 3 (green).

Round 6 : Work as for Rounds 4 & 5; increasing at beginning and end of each red petal. Total 96 dc; join with sl st. Ch 3 (green).

Round 7 : With green work 1 dc in each green dc and 1 dc in first red dc. With red work 2 dc in 2nd red dc, 1 dc in next 6 dc and 2 dc in next red dc. In last red dc work 1 green dc. Complete pattern with each leaf having 4 green dc and each petal having 10 red dc, with 2 red dc at beginning and end. Join with sl st; 116 st in all. Ch 3 (green).

Round 8 : With green make petal wider by working 1 dc in each green dc and 2 dc in first and last red dc of previous round. With red, work 1 dc in each of the 8 red dc remaining. Join with sl st; 128 st total, ch 3.

Round 9 : With green make petal wider by working 1 dc in each of the 8 green dc of previous round, plus 1 dc in first and last red dc of each petal. Add white and work 1 dc. With red work 4 dc in remaining 4 red dc. (No increases in this Round.) Ch 3.

Round 10 : (Leaf begins to taper); work 8 green dc; with white, work 1 dc in last green, 2 dc in white dc of previous round and 1 dc in first red dc. With red work 1 dc in next 2 red dc. With white, work 1 dc in last red dc, 2 dc in white dc and 1 dc in first green dc. Join with sl st. Break off red. Total 144 dc. Ch 3.

Round 11 : (Continue to decrease leaf); 6 green dc. With white, work 2 dc in first and last green dc of leaf and 10 white dc between the leaves. Ch 3, 160 dc total.

Round 12 : In this round, green leaf has only 4 dc and white is 18 dc, with an inc in first and last green dc of previous round. 176 dc total. Ch 3.

Round 13 : In this round, green leaf has only 2 dc and white is 22 dc. Make 2 inc in each st of white dc, in 5th or 6th dc from each end of white. Fasten off white. 192 dc total.

Round 14 : Fasten off green. Make 2 inc in each st of white dc, in 5th or 6th dc from each end of white. 208 dc total.

Round 15 : 7 ch, skip 3 dc, dc in next dc, (4 ch, skip 3 dc, dc in next dc), repeat all around ending with slip stitch in 3rd of 7 ch.

Round 16 : Sl st into each of 1st two chains of first loop, 1 ch, 1 sc, (5 ch, sc in next loop), repeat all around ending with 2 ch, 1 dc in first sc

Round 17 : 1 ch, 1 sc, (8 ch, sc in next loop), repeat all around ending with 4 ch, 1 tr in first sc.

Round 18 : Repeat round 17.

Round 19 : Repeat round 17.

Round 20 : 3 ch, 2 dc in same loop, (3 dc, 3 ch, 3dc in next loop) repeat all around ending with 3 dc in first loop, sl st into 3rd of 3ch. Fasten off.

Internet and Crochet


When we first started using the Broadband for Internet, my sister told me over the phone that she had found some nice patterns for her formal office wear which she would ask her tailor to sew for her. I "googled" for "suit patterns" and I did not find anything interesting. On an impulse I googled for "free crochet patterns" next and came up with quite a few links which I will share with you in my posts. My mother has been doing a lot of crochet over the years and now even in her seventies, her enthusiasm has not diminished. As I delved further into the world-wide-web, I found that I could download entire crochet books and magazines all for free!! My joy knew no bounds!! I will be posting here the steps you have to follow to be able to download these free crochet magazines and free crochet books like Magic Crochet, Decorative Crochet, Diana and many, many more. And I am sure once you find out how to do it, you are going to be as thrilled! Good luck and Happy Crocheting....


Not found the free crochet pattern you are looking for? For free updates :

Enter your email address:

Delivered by FeedBurner